How Your SOLAR Pro-Logix Battery Charger Works
Your SOLAR Pro-Logix battery charger uses an advanced high-frequency conversion technology, which replaces the transformer found in most other battery chargers. This technology enables a compact and portable form of conversion with excellent voltage protection as well as overload and short circuit protection.
Your SOLAR Pro-Logix battery charger is designed with built-in microprocessor control designed for use in a 120 Volt AC environment. The charger converts AC power to DC charging currents through switch mode technologies at frequencies between 40 kHz to 60 kHz. All SOLAR Pro-Logix battery chargers are fully automatic through all four operating phases and feature Push and Go One-Touch Control, such that once the charger is hooked up to the battery and a battery size is chosen, no additional input is needed from the operator.
When your SOLAR Pro-Logix battery charger is first connected, the microprocessor will automatically assess the charger/battery connection and then diagnose the batterys condition, starting with a temperature assessment. Then, it will go through battery-voltage diagnostics, lighting one of three warning LEDs if a specific problematic conditions exist: if the battery voltage is below 4.5V, reflects a short circuited connection (clamps touching, etc.), or indicates a reverse polarity connection. If any of these conditions exist, the corresponding LED warning will blink and the charger will not begin the charging process.
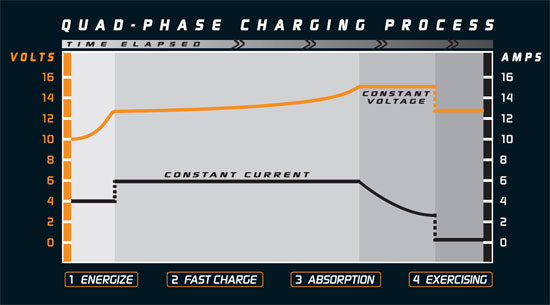
Once a 12 Volt battery is properly connected and no problematic condition exists, your SOLAR Pro-Logix battery charger will automatically initiate its unique, Quad- Phase charging cycle, utilizing exclusive Active Filtering Technology to deliver an ideal charge.
-
Phase 1 Energizing: The charger will begin with 5 minutes of low Amp charging, during which the microprocessor will automatically diagnose various protection modes of the battery. In this phase, the charger safeguards against high current surging through the battery and calculates the optimal charging rate for the subsequent charging phases. During this phase, the LED corresponding to Phase 1 will blink. Note: During this stage of the operation, if required, the charger will attempt to desulphate the battery plates and prepare the battery for Phase 2 Charging (the charger diagnoses and performs the desulphation routine automatically if necessary no input is needed from the operator).
-
Phase 2 Charging: Upon completion of Phase 1, the charger will automatically commence Phase 2, Charging, during which the charger will apply a fast or bulk charging mode to the battery. Through its constant pulsing current pump, the charger fast charges the battery according to a pre-set voltage, while avoiding over-heating. During this phase, the LED corresponding to Phase 2 will blink.
-
Phase 3 Absorption: Upon completion of Phase 2, the charger will automatically commence Phase 3 absorption, during which the charger will slow its charge mode to bring the battery to full charge. This is an important stage in the Quad-Phase process during which the charger verifies that the charging energy has been successfully transferred to the battery before the exercising phase is initiated. During this phase, the LED corresponding to Phase 3 will blink. Pro-Logix Battery Charger USERS MANUAL
-
Phase 4 Exercising: Finally, upon completion of Phase 3, the charger will automatically commence Phase 4, Exercising, during which the charger will monitor the battery and resume operation if the battery discharges for any reason. This phase keeps the now fully charged battery in an ideal storage condition for immediate service when the battery is needed. This phase will continue until the battery is disconnected from the charger or the AC power supply to the charger is interrupted. During this phase, the LED corresponding to Phase 3 will light solid.
SOLAR Pro-Logix chargers are designed for charging & maintaining 12 Volt batteries of the following types:
-
Conventional lead-acid
-
Sealed lead-acid/AGM
-
Maintenance-free
-
Gel-cell
-
Deep-cycle
Guide to Choosing the Right SOLAR Pro-Logix Battery Charger
Each SOLAR Pro-Logix battery charger is designed to optimally charge a specific range of battery sizes. Choosing the right charger for your specific needs will be best served by matching the charger that best corresponds to the batteries you plan to charge with the charger, as illustrated in the chart below.
|
Model No. |
Optimal Battery Range |
Low Setting Range* |
High Setting Range** |
|
PL2208 |
8Ah 60Ah |
8Ah 30Ah |
30Ah 60Ah |
|
PL2212 |
14Ah 175Ah |
14Ah 60Ah |
60Ah 175Ah |
|
PL2216 |
25Ah 200Ah |
25Ah 100Ah |
100Ah 200Ah |
Any SOLAR Pro-Logix battery charger can be used to charge a battery above the optimal charge range for that charger. The charging will be performed both safely and effectively for the battery the only variable will be the time it takes for the battery to reach a fully charged state. Many cranking batteries do not express the battery capacity in Amp Hours. The Amp Hour rating of the battery can be derived if you have the Reserve Capacity. If the battery capacity is rated in Reserve Capacity (in minutes), use the following formula to convert Reserve Capacity to Amp Hours. If these ratings (Amp Hours or Reserve Capacity in Minutes) are not printed on the battery, contact your local battery supplier for this information.
|
Reserve Capacity |
+ 15.5 = Amp Hour Rating |
|
2 |
If these ratings (Amp Hours or Reserve Capacity in Minutes) are not printed on the battery, contact your local battery supplier for this information.
SOLAR Pro-Logix Battery Charger Safety Features
Active Filtering Technology:
SOLAR Pro-Logix battery chargers utilize Active Filtering Technology, which provides numerous benefits to the charging process: 1.) It initiates a gradual voltage ramp-up during Phase 1, eliminating failed cold starts and high current surge impacts when the battery is at a low voltage level; 2.) When sensing heavy-duty loads which are within the chargers peak output range, the charger will automatically go into a soft-start-mode, ramping up power through gradually increased switching duty cycle, to reduce wear on the battery being charged. 3.) Finally, the charger will automatically compensate for changes in ambient temperature when determining the ideal charge characteristics for the battery being charged.
AC Voltage Protection:
SOLAR Pro-Logix battery chargers are designed to adjust incoming AC voltage to the optimal level, shutting down automatically when the AC input voltage drops below a specific level.
DC Voltage Protection:
If the charger is connected to a 24 Volt battery or senses reversed polarity, the Completion LED will light up to indicate the FULL charge status. No damage would occur to the charger or battery when this situation occurs.
Overload Protection:
In the case of the charger being connected to a battery of wrong size / capacity, there is an internal timing control in the charger to automatically shut itself down. It will require restarting the power switch to reset the charger.
Output Short Circuit Protection:
The charger will immediately shut down the charging circuits when a short circuit is detected. The charger will not restart until this problem has been rectified.
Reverse Polarity/Bad Battery:
If the output clamps are connected in such a way as to create a reverse polarity situation or if the battery being charged is shorted or damaged, the charger will not send power to the clamps and will cease operation. Either situation is indicated by a corresponding flashing LED warning on the chargers control panel. This condition should not cause any damage to the charger or vehicle. If the battery to be charged is below 4.5 Volts, all three warning LEDs will blink simultaneously. If this condition occurs, disconnect from battery, find and remove drain from battery and reinitiate the charging process.
SAFETY INSTRUCTIONS AND PROCEDURES
Ensure that both the charger and the battery being charged are in good condition before charging. Check that the leads, plugs, sockets and the battery surfaces do not show any signs of wear, deterioration or leakage.
Check that the battery capacity is within the recommended range listed for your charger model. Most batteries have labels that indicate their capacity in Amp Hours (Ahs). Please ensure that the capacity of the item you wish to operate is not more than the rated output of the charger you are using. Larger battery capacity requires longer charging time.
The charger will shut down if it is overloaded as a result of being connected to batteries that are grossly beyond the operating range of the charger. To restart the unit after this automatic shut down, turn the unit OFF. To turn the unit OFF, press the battery size selector button until neither corresponding LED is lit the unit is now turned OFF.
The charger can get very warm when in use: it must be placed in an environment where it will not cause any damage to articles in its proximity. Ensure the battery charger is located in a well-ventilated place during operation. NEVER use a battery charger around or near combustible materials. NEVER attempt to charge a frozen battery.
SOLAR Pro-Logix battery chargers are designed to synchronize charging characteristics with batteries that are generally in good condition and under three years old. It might not be possible to successfully charge an old or worn out battery.
Battery Charging Procedure
Follow the steps below for safe, effective battery charging. Prior to charging any battery, thoroughly familiarize yourself with this entire owners manual and the owners manual for the battery being charged and/or the vehicle in which the battery to be charged is installed.
-
Initiate your battery connection. The battery charger output clamps are colorcoded for your convenience: RED for positive output and black for the negative ground connection. Connect the RED (positive, +) clamp to the positive battery terminal.
-
Connect the BLACK (negative, ) clamp to the negative battery terminal.
-
Ensure that the clamps are in good contact with the battery terminals. This enables a smooth transfer of power from the charger to the connected battery.
-
Plug in the chargers AC power cord to a properly rated power outlet (120 Volts AC).
-
Turn the battery charger ON by selecting the proper battery size for the battery being charged, using the yellow battery size selection button (with a rightfacing arrow). The charger must be powered prior to making a battery connection in order to assess and diagnose the battery connection as it is being made. (To turn the unit OFF, press the battery size selector button until neither corresponding LED is lit the unit is now turned OFF.)
-
Any problematic conditions resulting from the initial battery connection will be noted by flashing LED warning lights in the Error Warning area on the chargers control panel.
-
Upon diagnosing a proper battery connection, the charger will automatically initiate and complete the Quad-Phase charging process. Completion of the charging process is indicated by a solidly lit Exercising/Complete LED.
-
After the battery is fully charged, turn off the main AC power switch (to turn the unit OFF, press the battery size selector button until neither corresponding LED is lit the unit is now turned OFF) and unplug the charger from the AC outlet, remembering to always pull by the plug and not the cord.
-
Finally, disconnect the battery by first disconnecting the BLACK (negative, ) clamp and then the RED (positive, +) clamp. SOLAR Pro-Logix Battery Charger Maintenance
Although your battery charger features a sealed-unit design and is weather resistant, it is important to store the charger in a clean, dry environment. Do not expose the charger to water or excessive heat.
The battery charger clamps should be returned to their storage position after each use and care should be taken not to damage the clamps or cables in any way. If the chargers clamps or cables show any sign of damage, or the insulation on either the clamps or cables has been compromised in any way, discontinue use of the charger immediately.
|